Here are the results at my first attempt at Shibori dyeing. These samples were all stitched to create a resist to the dye, by using different techniques the dye cannot penetrate the compressed fabric areas, thus creating the patterns. These were dyed using Turquoise MX cold water dye at 2%, the fabric used was fine lightweight white cotton.
These little circles were created using a simple BINDING technique to create rings of undyed fabric using small beads to create the circular repeating shapes. The bead positions were marked onto the fabric prior to binding.
This is another method of binding called SPIDERWEB. This is created by making a pinched umbrella like bunch of fabric and the thread resist is wound up and down the fabric bunch, here shown close up and as a group, I didn't like the inconsistency of the resist and dye dispersal.
Here are some stitched samples, for these the fabric is stitched and then gathered to create the resist. This is the least successful sample created using a technique called MOKUME where the fabric sewn in running stitch and pulled tight like a concertina. Dye penetrated the compressed areas more than it should have done.
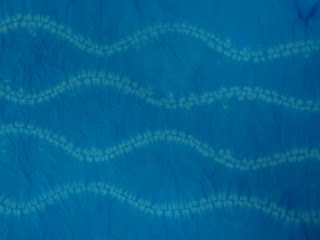
More successfully, this Shibori method is called ORI NUI where wavy lines are drawn, folded and stitched along the fold line to create two rows of dots.My final sample is my favourite so far (and I think the simplest) and is called KARAMATSU or Japanese Larch. In this case the fabric is folded and concentric half circles are drawn on the fold and then stitched with running stitch and drawn up tight to create the resist.
I found all of these methods in 'Shibori Designs and Techniques' by Mandy Southan.


No comments:
Post a Comment